Miller's Homemade Soap
Pages:
All-Vegetable Soaps
Page
*APOLOGY* ... to those of you who have emailed me this year (2012) and have never heard a peep out of me... I'm sorry. I don't have as much time for personal email responses as I once did and added to that have been a couple of trips, a surgery, garden catch-up, church responsibilities, soapmaking and orders and more visits from children and grandchildren who have moved nearby. I just can't keep up. If your email involved troubleshooting of a recipe or a lengthy response, it was probably put aside for when there was more time and then fell through the cracks because "more time" didn't happen. :-/ I don't see that changing through the end of 2012. I hope you understand and know I would love to be able to acknowledge every email I get.
|
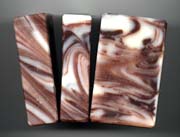
![[All-Vegetable Soaps]](soap/VegSoaps.JPEG)
- Soaps from center front
(white) moving clockwise: Stress Relief, Pumpkin Spice,
Almond Joy, Orange-Eucalyptus (in front of soap balls),
Fresh Peach, more Stress Relief (molded), and Rose
Garden.
|

All-Vegetable Soaps and
Recipes

In response to the most
frequently asked question! This banner was generously and humorously
contributed by Chris McClusky! :-) For a more detailed explanation,
browse through the questions on the "Soapy
Success"
pages.
Since I've been browsing other people's websites about soapmaking,
I realize that it currently doesn't seem to be politically correct to
make soap using animal fat, which is how I made it for years using
the lye company's instructions. Since reading more about
all-vegetable and finding sources for hard vegetable fats, I've had a
lot of fun experimenting with different all-vegetable combinations.
I'm not impassioned on the subject, however, and provide information
for both camps. I love animals...but I do eat meat (not my favorite,
but I eat it) and use animal products. I can appreciate that there
are those who choose to refrain from such.
From a neutral perspective, there are pros and cons to either type
of soap. One of the pros to making soap with animal fats is that it
is much cheaper, if you can find a reasonable source of fat for
rendering. Even if you buy your materials at wholesale, I suspect
that it will cost more to make all vegetable soap, so that should be
a consideration if you are making your own soap to economize. Soaps
made with a combination of lard and tallow tend to be harder also,
which I like. When making soaps from animal fats, I have usually
preferred to have a mixture of about half and half and at the very
least, one pound of beef tallow to 5 lbs. of lard for hardness. All
lard soap is a bit soft and can sometimes be kind of tacky to the
touch. All tallow soap is a bit too hard for my tastes and can
sometimes be brittle.
If you just want homemade soap for its mildness and don't mind the
cost, there are things to recommend all vegetable. It doesn't tend to
have as much odor after curing (although my sensitive sniffer can
always detect the olive oil in castile soap if the light oil is not
used), you don't have the mess and smell of rendering (my kids
complain when I'm doing that!) and it won't gross out your friends
that there's animal fat in the soap if they find that to be a
problem. As of the fall of 1998, I've been experimenting with
all-vegetable and since discovering the stick blender, I may not go
back to the other! (Especially since I have to buy animal fats and
don't have them for free any longer.)
- Homemade Soaps for
Sale
-
- Click
Here for Details...
IMPORTANT NOTICE ABOUT RED DEVIL
LYE IN THE U.S.!
NOTE (September 2005): After
receiving a couple of emails, I've finally come to believe
that it's true... the company that markets Lewis Red Devil
Lye has pulled it from the market and has
replaced it with a liquid drain opener that contains no lye.
My suspicions are that it's due to its use in the illegal
manufacture of methamphetamines. This is very sad for the
home soaper! :-( I've been buying my lye in bulk for quite
awhile now, but for the average person that wants to make
one or two batches and has gotten accustomed to buying it
locally... this will need to be addressed. Here is a helpful
link sent by Nancy M., whose email comment is
underneath:
http://candleandsoap.about.com/od/coldprocesssoapmaking/a/lyesources.htm
When I bought the two remaining
containers from the local Albertsons, I was told it's
popular in this community in the production of meth. When I
mentioned it to a clerk at the JoAnn's fabric store, where I
was fruitlessly trying to find any kind of other soapmaking
stuff, I found out she's a soapmaker and that she got her
lye at the local Grocery Outlet, in bulk. They don't have it
out where anybody can see it, but if you ask and show ID,
you can buy it.
Anyway, I'm having fun, that's the point and thanks again
for all of your help :-)
Nancy M.
from the dry side, Clarkston, Washington |
![[No more lye!]](soap/reddevillye.jpg)
Graphic courtesy of About.com from
Soapmaking
article by David Fisher
|
Contents
of this page:
RECIPES:
(*
mark my favorites or
simpler recipes...
3*s
= the
BEST!)
All recipes will yield
about
7
pounds of
soap,
or 28 4-oz. bars, after
cure.
All recipes are based on
WEIGHTS,
not volume. You will need to weigh oils and lye with a good
scale. Water can be measured with a liquid measuring cup
with no problems.
Shortening Recipes:
No Palm Oil:
|
Modern
Soapmaking Procedures/Stick Blending
Recipes Using Palm
Oil:
Recipes Using Palm Kernel
Oil:
|
Other Links:
|

|
|
Special Utensils?
- I've read in so
many places that you should have special pans and tools for
making soap that I just had to put in my two-cents worth
here! I have never set aside my kettles, bowls,
pitchers or stainless steel utensils only for
soapmaking...it would seem silly to me. A wooden spoon is a
different case. Wood is absorbent and you could never wash
out all the junk in the wood after using it on soap (kind of
makes you wonder how sanitary it is for other things as
well!). If you are stirring with a wooden spoon, then by all
means label it for soap and use it for nothing else. I use
my regular beaters for soap, and everything else is used for
other cooking purposes as well. Lye is not going to absorb
into your stainless steel, plastic and glass containers (if
it was that tricky, it would absorb its way right through
the plastic container you buy it in)! Just wipe them out
well (if there's raw soap in or on them... toss that into
the trash to save your pipes from the grease) and wash
with hot soapy water and rinse with hot water...just like
you would any other dish. That's it. I don't know
why we carry our respect for lye into paranoia, but I
suspect we run a greater risk from eating off dishes that
come out of our dishwasher, than to use our soapmaking
utensils for cooking purposes! Enough said!
Here's some feedback
on wooden utensils I received after posting
this:
- Subject: About
wooden spoons
- Date: 12/22 10:59
AM
You mention on your soap
making page you wonder about the sanitary properties of
wooden utensils in everyday cooking. You may be surprised to
learn that it is better than metal or plastic!
They did a study where
they measured the bacteria counts on the surface of a
butcher block table and the surface of a stainless steel
table. They cleaned them identically, took measurements,
then waited several hours and measured again. Almost all the
bacteria on the butcher block table were dead. The amount of
bacteria on the steel surface had multiplied many
times.
They determined that due
to the inherent antibacterial properties of wood, it
actually kills bacteria instead of allowing them to live in
the pores as common sense would dictate.
Thought you might like to
know that perspective.
- David
P. Ihnen
- Systems
Administrator
- OIBU Lab
Support
- Cisco Systems,
Inc.
Knowing what lye can do
to wood over time, I would still be quite reluctant to use
my soapmaking spoon for cooking...blah! But, this was very
interesting! Thanks! Of course, I don't know that any
self-respecting bacteria would survive contact with lye for
very long. My stainless steel pan that I use for dissolving
the lye solution is the cleanest pan I have in the
house! :-)
An Update (Very
Interesting... I find this easier to
believe!):
- Subject: Wooden
utensils
- Date: 08/21 10:55
PM
I just wanted to let you
know, for the sake of correctness, about the situation
regarding wooden surfaces vs. plastic or steel. I read the
post that you had on your website about the experiment where
it was shown that bacteria multiplies better and faster on
steel than wood. (I know that it wasn't your post, but it
was on your page) I've been working in the food industry for
about eleven years now, and I was intrigued when I heard
about this study. Unfortunately, I learned very soon after
that when some other researchers tried to duplicate the
experiment, they got the opposite results. In fact, no one
has ever gotten the results that the first researcher
claimed to have gotten. Problem is, the new discovery gets
front page, because it's fascinating, but the failure of the
new discovery gets put somewhere in the middle of the paper.
I don't think that anyone ever stopped cleaning their
counters just because they were made of wood, but you never
know. Best to have the facts.
Yours truly,
P.J.
Buchan
|
The following recipes list
ingredients but few procedures. If you need BASIC SOAPMAKING
INSTRUCTIONS, you will find those on the main
soapmaking page. To
read more modern instructions (how I do it now) go to the
Modern Soapmaking
Procedures
page.
***All recipes will YIELD
about 7 pounds of soap, or 28 4-oz. bars, after
cure.***
My First All-Vegetable Attempt with
Instructions:
This was my first batch of all vegetable soap
(Spring of '98). The ingredients used were as follows:
All Vegetable Soap
Do you need METRIC
measures? Check out this conversion tool at Majestic Mountain
Sage: Majestic
Mountain Sage: Measurement Conversion Calculator.
You type in the measurements,
hit the button and it will convert them for you.
- These next two online calculators are
thanks to Anna Merhoff!:
- http://www.therepertoire.com/ccc/conv.htm
- http://www.foodwine.com/cgi-bin/hts?convcalc.hts+usequiv+new
-
- 28 ounces of coconut oil (2 jars)
- 24 ounces of olive oil (the cheapest and
lightest in color)
- 30 ounces of vegetable shortening (the
cheapest, and purest you can find)
- 12 ounces of lye (one standard can of Lewis
Red Devil)
- 32 oz. cold water (4 cups)
- 1.5 - 4 ounces essential and/or fragrance oil depending on
strength and your nose, if soap is not intended for remelting
-
- *ASH
- It has been suggested
that using some beeswax in the recipe in place of some of the fat
will prevent ash, which sometimes forms on surfaces exposed to air
while the soap is setting. Many batches will not have the problem.
If you would like to do it, I suggest substituting 4 ounces of
beeswax for 2 ounces of the fat.
Some people prevent ash on
their soap by putting Saran wrap on TOP of the soap after it
is poured. You can release air bubbles by gently poking it with a
needle. After the soap sets for 24 hours, the plastic will peel off
easily. If you use some sort of plastic other than food grade, you
could have a problem with your soap becoming discolored after
unmolding. Something else that works well on top of the soap, is
a thin piece of mylar plastic (used by quilters to make pattern
templates...buy at a fabric store).
A third suggestion I recently read
about on a soaplist was to put your freshly poured soap mold into the
oven with a pan of water and the light left on (NO heat...only the
light). Be sure to put a sign on the door so that no one (including
yourself) turns it on! The water provides humidity while the light
provides gentle heat. No need for blankets and such this
way.
Follow the usual soapmaking instructions, although the
temperatures of each solution before blending should be around
95º to 110º (lye solution the cooler of the two). I mixed
them together with a hand held mixer for about 20 minutes and after
that, just stirred it every few minutes until it "traced" (which took
between one and one and a half hours). At that time, I poured it into
a cat litter pan (never used) which was lined with a sheet of plastic
wrap, long enough to hang over two sides. This helps you turn out the
soap and keeps it from sticking on the center bottom (which is where
it always tends to stick if it's going to do that). This was placed
into a cardboard box, and put a warm blanket over the whole thing. It
was turned out and cut in about 24 hours plus. If you don't have a
cardboard box large enough, set your pan on a towel and then put a
large piece of cardboard over the top, then cover it with more towels
or a blanket, out of drafts.
Return to Table of
Contents
Rebatching:
I tried rebatching the soap, following the instructions
from Pamela Love, of Soap Crafters
Company, and what was supposed to look like "runny marshmallow
creme" after melting and mixing looked more like a stiff gummy batch
of mashed potatoes. (I melted it using the
crockpot and also tried it in a slow oven.) Soap is like that
and I'm not going to blame her. Instead of messing around with
crushing that stuff into molds (I tried a few), I poured the little
batches into small bread pans which had been lined with a piece of
plastic wrap and will cut them into bars after they've dried out for
a couple of days. She had a few recipes on her page but I combined
some different essential oils with herb teas and ground spices in
combinations that sounded appealing to me. You can experiment all you
like...just write them down so that you can recreate something if it
turns out really good. Her rule of thumb for each one pound of
remelted soap was to add one cup of milk (I assume this is to
give the soap that "antique" color...water worked fine also), 1/2
tsp. of essential oil and about 1 T. of dry herb (if you like). You
can get more instructions by linking to her website and also find
some wonderful suggestions from other "soapers" on the Rebatching,
Remelting, Remilling, etc.
page.
Personally, I avoid rebatching like the plague (only when a batch
is totally separated) but if you must, here's one of the great
suggestions you will find on the Rebatching
Page...
"I am so excited!!! I have found the way to
rebatch! I've been doing this soap thing for about 2 months. I
have found the perfect way to rebatch (determined!!) I found
these boiling bags at the local Walmart Store for melting candle wax.
(I suspect you could also use
those baking bags you can buy at the grocery for doing turkey and
poultry.) I grate my basic soap and fill the
bag. I add any liquid (you don't need a lot ... just depends on how
dry the soap is) like a small amount of water, extra glycerin, oils,
aloe vera gel, etc., really just enough to moisten the soap, and put
a twist tie on the top. Drop the bag in to a pot of water and bring
to a boil. Check periodically ( I pick the bag up and squeeze it with
pot holders to mix) until it is all melted (it gets quite liquidy). I
then open the bag and add color & fragrance(?) etc... I squeeze
with pot holders to mix and sometimes put back into the boiling water
to keep it melted. I snip the bottom corner out of the bag and
squeeze into molds. It sets up very quickly if it is too cool but
shrinks very little. I put the molds in my freezer overnight (I'm
usually doing this stuff at 8:00 or 9:00 pm) and the next morning I
pop them out of the molds. It is working wonderfully and hope this
helps any other frustrated rebatchers out there!" -Carol Justice,
carol_justice@hotmail.com
Here's another interesting suggestion from a soap
list...just be careful and not cook for too long or you'll have a
soap monster in your microwave! :-)
"In a mad-dash to rebatch some soap to give as a
present, I used the microwave to rebatch. I took my grated soap and
put in a plastic pot, added my milk and zapped it for two minutes at
a time. Stirred and zapped again. In 5 minutes I had the soap ready
for the mold. I measured 24 ounces to rebatch. It was great!!!"
-Janice, Faery Hill Gardens
|
This was the recrafted or rebatched all-vegetable
soap I tried the first time. The dark
one is cinnamon with ground nutmeg and cinnamon and clove
oils added. Continuing, clockwise, are Mandarin Orange Spice
tea with crushed cardamom seeds and lemon oil, lemon with
oatmeal and honey, anise oil with Wintermint tea, bitter
almond oil with honey. The almost white bars are what the
soap looked like before remelting and adding essential oils
and spices. The bars are thinner than I'd like, but couldn't
find the right pan for the amount of soap I had! Soap balls
were made from the scraps after trimming and
beveling.
|
![[Recrafted Soaps]](soap/AllVegSp.JPEG)
|
![[All-Vegetable Soaps...mostly!]](soap/Soapsmixed3.JPEG)
|
- Clockwise from front left:
Almond Joy, Soap Balls, Orange-Eucalyptus Molded (over
Oatmeal and Honey), Rose Garden,
- Fresh Peach, Citrus Blend,
Stress Relief, Orange-Eucalyptus Bars, Pumpkin Spice (in
blue box)
-
|
More Recipes!
Now we're on a
roll!
These recipes have been run through the Lye
Calculator at the Majestic Mountain Sage site.
They allow for approximately 5% extra fat, so if you are going to
superfat the soap you may want to cut back slightly on one of the
oils in a recipe.
You can put together most any combination of
oils you wish and create your own recipes using the saponification
chart on the "Design Your Own
Recipe" Page. I'm only listing what I did
in case you want to copy it or work off these:

Return to Table of
Contents
I have never made this soap
myself, but periodically get a request for a recipe, so I'm passing
on suggestions I've gleaned from others who have made it. If you do
this and have problems... I'm probably not the person to ask! :-)
Pine Tar
Soap (Notes)
First of all, you can choose any soap recipe
and make it into pine tar soap. It's a matter of adding it to the
recipe you have chosen... all vegetable or animal fats. From what
I've read, I think the easiest method is to add the pine tar to the
melting oils at the beginning. You can buy pine tar at a feed
store... it is used on horses hooves for conditioning purposes (and
be sure to read the label and make sure it is 100% pine tar and
not pine rosin). To save on cleanup later... use a disposable
spoon to get the tar out of the container (a stout plastic spoon or
even a wooden popsicle stick will hopefully do the trick) and drop
the spoonfuls into the melting oils. They should break up as the fats
melt and warm up and you can incorporate the tar into the fats. I'd
be sure they are completely blended in before proceeding with the lye
solution, etc. and you will still want to check for correct temps as
usual. Pine Tar soap tends to come to trace more quickly than soap
without it, so you might do well to go with a higher water addition
rate for the recipe rather than the low end suggestions. For recipes
on this site... around 32 ounces of water would be good. For a recipe
that makes 28 bars like the ones on this page... you will likely want
to add about 6 to 7 ounces of pine tar to the pot with the base oils.
Scenting is kind of a moot point because the soap will cure out with
the scent of pine (less tar with aging ). If you decide to scent
along with the natural smell of the pine tar... pick something that
will blend well with that or enhance it... and you'll have to move
quickly since the soap is going to want to set up quickly and you'll
have little time for extra fussing around. Essential oils might be
better behaved since you are already going to have soap with a
tendency toward accelerated trace. Another comment was that pine tar
soap took longer to harden up during cure, but once hard that it was
very long lasting.
If for any reason you have some sticking to
your bowls or utensils after the mixing process... soaking them for 1
or 2 days in warm water will aid in removing the residual pine tar...
but hopefully with the technique above... you'll not have that
problem. If you try these suggestions and it works out well for you
(or not)... please email
me with feedback and I'll adjust these
suggestions accordingly. :-)
I got some feedback from one gal who said
that the above warning was not sufficient enough to prepare her for
how FAST her soap set up! Here is another recent email that I wanted
to post... this fellow is delightful to read and has some good
feedback for those who decide to take the plunge. :-)
- From: Bill Adams
- Date: Sat, 9 Apr 2005
- Subject: Pine tar 20%... don't use a
stick blender
Hello again Kathy,
As you see I went for the 20%.....I used the
"more is better" theory.... kill you twice as fast..... go for it
..... just do it.......
The soap really did not ever get hard around
the edges so........
I did remelt this batch of soap.... if you
could call it a batch of soap. I just set the Pyrex dish in the
microwave, heated it till it began to froth up around the edges,
reset the heat to number 2 (out of ten) and cooked and stirred. It
took 30-40 minutes to have a pretty good melt.......all the hardened
pieces were broken up. I cooked it another 10 and most of the small
pieces were dissolved. I took it out and continued to stir till it
was setting up, shaped the edges and quit. Looks like a German
chocolate cake....hope no one decides to have a piece before I get
the icing on.....
[Just a warning... if you decide to
remelt a batch according to what Bill did... you'd better watch it
like a hawk. The only thing worse than a soap volcano in your
microwave oven, would be one laced with pine tar. I don't even want
to think about how long it would take to clean up THAT
mess!]
According to Hersh, it doesn't matter how
much pine tar you add, it sets up to a point of not being able to
pour it in 28 seconds, little tar or a lot of tar. I suppose it would
help to use lower temperatures for the fat and lye, add additional
water, (which the soap spread sheet does for you when you plug in the
pine tar amount) mix with a paint stirring stick. (NO STICK
BLENDER. If a stick blender accelerates a normal batch of soap,
you can imagine what it does to pine tar. Instant pudding followed
by instant brick.) Pour the lye while stirring, and try to get it
thoroughly mixed, and poured, before it sets up. (In my case I did
not even get it mixed in the container I intended to use as a mold.)
I am going to see what this soap is
like.....my dog needs a bath.....ha
Later...
Bill Adams
More suggestions...
From: Pat Lowe
Date: July 2, 2009
Subject: Note About My Experience with Making Pine Tar Soap
Hi,
I've made my own pine tar soap for several years now. I use a double-boiler type arrangement to soften my pine tar before adding it to my soap base. One easy way I do this is by using a very old (small) sauce pan that I have dedicated just for this purpose. I place it on my stove top burner, add a cup or two of water in it, then add the small can of pine tar inside the sauce pan. It is VERY important to leave the lid to the pine tar can open so that when it gets hot, it doesn't explode all over my kitchen. It is also important to make sure that the water in the sauce pan does not cover more than the bottom half of the pine tar can, so that when the water boils, it does not boil over into the pine tar. Then, when the pine tar is softened to a more or less liquified state, I carefully lift the can with kitchen tongs and then pour in the amount I desire into my soap base mixture just about the time it is ready to trace. I mix it as thoroughly as possible, trying to get the color evenly distributed, and then pour it into the soap mold I have prepared for use. I've had very good luck with this method and thought I'd share it with you all. If I use less than the entire can of pine tar in my soap batch, then I just let it cool a bit again and press down the top of the can onto the can and use it for my next batch of soap. I love pine tar soap, and the users of my pine tar soap have nothing but praise for it once they use it. It is a lovely old-fashioned soap with many uses, and it is too bad that many people have to be educated on its existence and its uses.
Pat Lowe
P.S. I have never had to soak my soap making utensils for a day or two to get out the pine tar residue. What I do is use stainless steel pots and spoons, and a rubber spatula to scrape the soap out into the mold. When the pots, spoons, and spatulas cool a little bit -- not completely -- but are still slightly warm, I put them in my sink and runn warm-hot water in and over them, let them soak for about 30 minutes, more or less, and then use a dishcloth or throw away sponge and wash them out. It doesn't always 'slide out', but it is not difficult to wash out the pine-tar soap residue, either. Hope my suggestions are of use to your readers and fans of pine-tar soap-making!
Return to Table of
Contents
Recipes Using Shortening:
*
Designates reliable,
simple recipes - any of the scent and color combinations can be used
with any recipe.
*Fresh Peach
(Base Recipe by Sandy
Maine)
- 24 oz. coconut oil
- 38 oz. vegetable
shortening
- 24 oz. olive oil (added after
melting the above)
- 4 cups (32 oz.) cold water
(I prefer 24 to 28 oz.)
- 12 ounces lye crystals
Add at trace:
- 2 oz. Peach Deluxe fragrance
oil (Sweet Cakes)
- 1 tsp. Bitter Almond fragrance
oil (Sweet Cakes)
- 2 tsps. paprika (for peach
color)
|
![[Fresh Peach Soap]](soap/FreshPeachSoap.JPEG)
|
Temperatures: 95-100 degrees
This basic recipe was taken from
Sandy Maine's Soap Book. I used the stick blender and added
the paprika and oils at light trace. The soap oozed a bit of oil or
glycerin from the top and I don't know if I added a little too much
oil while weighing the ingredients or what. Otherwise, it looks fine.
Sure smells great and the paprika gave it the perfect peach color!
Hope the peach smell holds after curing...so far, so good. I didn't
like the texture as well as some of the recipes that follow...it was
more tacky and flexible when cut after 24 hours. The final product is
fine, but my preferences run to smooth, firm and silky from the
start.
If I make this again (it
did lather nicely) I would bump the shortening back to 36-37 ounces
and reduce the water to 24 or 28 ounces.
Return to Table of
Contents
Good basic recipe that is easy to
measure because you use a standard 3# can of Crisco as a
base.
*Rachael's "Tried and True" Recipe
(Thanks! to Rachael
Levitan)
- 48 ounces Crisco (a 3-pound
can)
- 21 ounces Soybean Oil
(or Olive, Canola, or a
blend of these)
- 18 ounces Coconut Oil
- 28 ounces of cold water
- 12 ounces lye crystals
Temperatures: 100 degrees
Trace by hand should be in about 20 minutes.
Cure about 24-48 hours before cutting.
(I've done this with the stick
blender and trace happens in about 1 minute! If you want to mix soap
that way, this is probably not the recipe to use...unless you're
quick! ...Kathy)
A Nice
Variation:
Cucumber with Shea Butter (very mild in
scent and moisturizing)
-
- Add to base oils:
- 3 T. shea
butter
- a few shavings of
green wax candle color (maybe about 1 1/2 loose
teaspoons)
Add at light trace
(mine wanted to seize up...make it very light
trace and then work fast!)
- 3 ounces Econocuke
from Sweet Cakes (or some other cucumber
fragrance)
|
![[Cucumber Soap]](soap/CukeBar.JPEG)
Don't labels make a
difference?
|
Return to Table of
Contents
A couple of people on the Latherings Board raved
about this basic combination, so I thought I'd post it for those of
you who have trouble finding coconut or palm oil. I haven't tried it
yet. Let me know if you try it and like it!
All-Vegetable, No Coconut or
Palm
- 56 ounces olive oil
- 30 ounces vegetable shortening
- 9 ounces castor oil
- 12 ounces lye crystals
- 28 ounces cold water
- 2 T. salt dissolved in a small amount of hot water and added
to lye solution
The salt was felt to be an
important part of this recipe, although I imagine you'd have nice,
but softer soap without it. I would keep it in unless you try it that
way and don't like it as well as soap without the salt.
Return to Table of
Contents
This has real eye appeal for people. Some like the
zesty quality added by the bergamot and other essential oils, and
others might prefer to leave out the oils and only put in the herbs
and spices.
Zesty Calendula
- 32 ounces soybean oil
- 32 ounces vegetable shortening
(Crisco)
- 14 ounces olive oil
- 10 ounces coconut oil
- 1 ounce of stearic acid
(optional)
- 28 ounces cold water
- 12 ounces lye crystals
-
- Temperatures were around 110 degrees.
|
![[Zesty Calendula Soap]](soap/ZestyCalend.JPEG)
|
- Add at trace:
- 3/4 oz. Citronella EO
- 1/2 oz. Bergamot EO
- 1/4 oz. Rosewood EO
- 1 1/2 tsp. ground Ginger (dry
spice)
- 2 T. freshly ground Coriander Seeds
- 1 cup Calendula Petals (pulverize a bit in the
blender after measuring)
- About an ounce of Vit. E. Oil (If you can get
it to pour fast enough!)
-
This was a bit soft when cut,
but has firmed up pretty nicely (I originally made it with more
water...you can even cut it to 24 ounces and it should be fine and
nice and firm after 24 hours). After curing it really smells more
like lemon than anything else. I have to give credit for the
inpspiration where it's due. A Garden Eastward offers an essential
oil blend called Rachael, and I copied some of its
ingredients. The real scent blend is probably even better, but I
was too cheap to buy it along with everything else I ordered!
Maybe next time.
Return to Table of
Contents
*Note on Milk
Soaps: I haven't
mastered soaps with milk and honey in them (about a 50/50 track
record!) but have learned a bit more since making the first ones.
Milk and honey both can cause overheating in soap. When you
make a recipe with milk or honey or both, you should only
slightly insulate, or not at all. With a deep mold, I think I
would completely pass on insulating. If you are sure the soap is at
thick trace when you pour and don't insulate... hopefully, you won't
get a separation like the one shown at the top of the "Botched
Batches" page! :-)
Had a bit of difficulty with this one and needed
to reclaim it in the oven. The potato masher came in handy for
breaking up the chunks...it remelted quite nicely. What a relief!
There was an ammonia smell when I put it into the enamel pan for
reclaiming but that subsided after the ingredients completely
blended. I think the slight ammonia smell comes from the milk in the
soap and you might notice a little of that even when your soap works
out the first time! It should cure out in a couple of days. The
recipe below was a slight variation of Rachael's recipe (above) and
her original oil quantities could easily be substituted.
Spiced Milk and Honey Soap
- 48 ounces shortening (Crisco type - 3# can)
- 22 ounces coconut oil
- 16 ounces olive oil
- 24 oz. cold water
- 12 oz. lye crystals
Temperatures: around 100 degrees
After incorporating the lye solution with the oils,
add:
- 12 oz. can evaporated milk, warmed (for lighter
colored soap with firmer texture, you can use only 6 oz.
evaporated milk and increase the water by 2-4
ounces)
- 1/4 cup honey, dissolved into milk (for a lighter
color and less tendency to separate, you can cut this
back to 1 T.)
- At light trace, mix in:
- 3/4 oz. cinnamon oil
- 1/2 oz. clove oil
|
![[Spiced Milk and Honey Soap]](soap/SpicedMlk%26Honey.JPEG)
|
The essential oils will accelerate
trace, so be prepared to quickly pour the soap when it starts
to thicken. The milk will turn color as you watch after being added.
Maybe if it had been cooler, it wouldn't have gotten quite so dark,
but the color goes well with the spices. In the future, I will not
insulate a batch like this until it begins to cool after going
through the "gel" stage. Rachael had a different method for mixing
her milk soap (on the Soaps
Using Animal Fats page)
and you might prefer to do it that way. Other people have used this
method and it has worked fine...not sure what I did, but glad to be
able to use the soap in the end. It will take longer to cure than
some of the other batches, partly because of the extra water added
during remelt and because of the milk content. At least, this is what
I've read. Probably only a matter of a couple of weeks
more.
- Subject: Milk Soap Technique
- Date: 8/28/2001 5:41 AM
Have been so busy haven't had time to visit my favorite soap page,
but returning to it is like a reunion with an old friend! Just a
little something to share with you regarding milk soaps...I find that
I don't seem to get the discoloration associated with milk soaps with
this method and so far it has worked every time. I'm referring to
that orange-red discoloration that happens, not the antique color
that is usually associated with milk soaps.
- Reduce the amount of water that the lye is mixed with to
accomodate for the total fluid content of the recipe.
- Mix a concentrated batch of "milk" using evaporated goat or
cow milk to total the amount of fluid the recipe calls for.
- Mix your lye and fat together as usual and as soon as is is
mixed, then add you milk mixture instead of waiting until
trace.
This may be an easier technique for novice soapers. You can
increase the milk concentration in the recipe this way, also, and I
find that it's more economical for me to use the evaporated forms of
milk, because that way it is always available and I can just mix what
I need instead of trying to figure out what I'm going to do with the
leftover fresh or canned milk.
I continue to enjoy your soap page! Thanks, Sarah D.
This is basically the method that I
use... I buy the canned evaporated goat's milk at the supermarket.
Usually no more than 6 oz. does the trick. You can use cow's milk
also... either will work. - Kathy M.
- Subject: Awesome milk soap trick
- Date: 10/3/2001 8:48 PM
I was playing around in my cupboard today and hit on a great trick
for making milk soap. I am interested in nutrition, and keep
"Non-instant powdered milk" around to add to my smoothies. About 3/4
c makes a whole quart's worth of milk.
I added .7 ounces to the premeasured water and blended well with
the stick blender. Then I added the lye and stirred by hand for a few
minutes. I made my usual batch of soap, and it worked great! No
overheating, bad smell, or anything! You can get non-instant powdered
milk at any health food store. The soap itself was very light in
color, the same shade it usually is (scented with lemongrass and
sandalwood FO).
Thanks for running such a great site!
Heather
Return to Table of
Contents
*Note on Milk
Soaps: Milk and honey
both can cause overheating in soap. When you make a recipe
with milk or honey or both, you should only slightly insulate,
or not at all. With a deep mold, I think I would completely
pass on insulating. If you are sure the soap is at thick trace when
you pour and don't insulate... hopefully, you won't get a separation
like the one shown at the top of the "Botched
Batches" page! :-)
This was posted by Michelle M. on
the Latherings Board in January of 1999. She based it on Rachael's
recipe that is on the animal fats page. It calls for goat's milk, but
you can use cow if that's what you have.
Oatmeal, Milk and Honey
- 48 ounces shortening (a 3#
can)
- 18 ounces coconut oil
- 12 ounces soybean oil
- 10 ounces canola oil (olive can be used
as well)
- 12 ounces lye crystals dissolved into 18
ounces cold water
- One 12 oz. can of evaporated goat's milk
added at light trace (for lighter colored soap with a firmer
texture, you may use 6 oz. evaporated milk and increase the water
to 22 oz.)
Temps: 95-100 degrees
- Add at trace
(Michelle):
- 2 ounces of A Garden
Eastward's "Flower Power" (soaps very
cinnamony)
- 3 T. honey
- A sprinkling of
cinnamon
|
- Add at trace
(Kathy):
- 2 ounces of Sweet Cakes
"Oatmeal, Milk and Honey" FO
- 1 cup pulverized (blender)
oats
- 1/4 cup honey
|
Recipes With No Palm Oil:
Return to Table of
Contents
This has a nice texture and
I made two different versions (below). It lathers much like the
castile recipes:
*"Canolive" Soap
(Kathy
Miller)
- 40 ounces Canola
Oil
- 36 ounces Olive Oil
- 12 ounces Coconut
Oil
- 24 ounces cold
water
- 12 ounces lye
crystals
-
Temperatures: between 90-100
degrees
|
![[Easter Egg Colored Soaps!]](soap/EasterEggSoap!.JPEG)
Some bright colors here (some not
intended)! The soap on the left is the "Canolive" Iris
Blend. The center soap was scented with Sweet Rain FO from
Sweet Cakes and is the "Favorite
Castile w/No Palm" (on the
Castile Recipes page). The soap on the right was colored
with 1 cube (1/2 cup) of coconut oil sold for corn popping.
Less would have given the color I REALLY wanted! (Maybe one
pat or two instead of a whole stick!)
|
|
Spiced Apple:
- Add at trace:
- 2-4 ounces "Apple Jack and
Peel" FO from Sweet Cakes
- Since I only had two ounces...I
also added:
- 1 oz. Sour Apple flavoring oil
(leftovers!)
- 1 tsp. Cinnamon oil
- 1/2 tsp. Clove oil
- teeny bit of Citronella oil
(more of orange would be better...maybe about 1
T.)
- A little green candle dye added
to melting oils
|
Iris Blend
- Add at trace:
- 2 ounces Iris FO from Sweet Cakes
- 2 tsp. Peru Balsam essential oil
- 1 tsp. Rosewood essential oil
- A small amount of purple candle dye added to melting
oils
This is pretty sweet and
I wouldn't add any more than this...you might even want to
cut back a bit on the Iris FO.
|
This soap came out very nice and the
canola is more reasonable in price than olive. I prefer all-vegetable
bars that have a firm smooth feel and are not tacky or oily to the
touch after 24 hours. I also like the soap to be more opaque and not
translucent in coloring and it seems that soaps that are lower in
olive, palm and coconut and higher in shortening and more unsaturated
vegetable oils have that texture that I don't prefer. They can harden
up quite nicely and make fine soap...we all have our little
preferences!
Return to Table of
Contents
This version of "Canolive" has a
higher percentage of coconut oil for more lathering and makes a nice
hard, smooth bar. It can be poured at a lighter trace and be okay. It
received a "thumbs-up" from Sherry Wersing:
I must tell you, you really hit
a winner big time with the CANOLIVE II (SEQUEL). I love it. I made it
in a very small batch to test, then made a double batch (that would
be only 1/2 your recipe still!) that fit perfectly in that size
Rubbermaid drawer organizer! I am compelled to write to you to tell
you how great that soap is (I'm anxious to see it in use...see,
without palm oil I hope it can stay hard). If you put in molds, I did
a couple, it is so shiny, like a big shiny white chocolate bar! But
not shiny in the box type molds. I am going to make more of those
soaps. I love them. And I can make them without ordering palm
oil.
Canolive II
(The Sequel)
-
36 ounces canola oil
(or you may
substitute sweet almond, corn, peanut oil, or any
blend of those oils if you'd like)
- 36 ounces olive
oil
- 16 ounces coconut
oil
- 24 ounces cold
water
- 12 ounces lye
crystals
Temperatures: 90-100
degrees
-
This soap has a
very nice texture after 24 hours (cutting
stage). I used the stick blender, so don't know how it
will be with hand stirring. If you are not comfortable
with the low water content, you could bump it up to 28
or 32 ounces, but I like the firmer bars that don't
take as long to harden up.
|
![[Canolive II... Orange-Eucalyptus]](soap/SoapCanoliveII.JPEG)
- This was the second
Orange-Eucalyptus Combination
- using pulverized orange peel,
orange, eucalyptus and
- citronella oils. If you don't
want the citronella smell
- you can leave it out, but it
holds better than orange.
- Original version is on the
Castile Soaps page.
|
-
Return to Table of
Contents
Here's the last one with even MORE
coconut oil! :-) (I found a local source for coconut oil that makes
it cheaper than olive, so I've been using more of it lately to see
how the end result compares.)
"Cocanolive" Soap
(Kathy Miller)
- *37
ounces canola oil
- 24 ounces coconut oil
- 26 ounces olive oil
- 28 ounces cold water
- 12 ounces lye crystals
Temperatures: 110-120
degrees
When I combined the lye solution
with the fats, this got a bit grainy looking at the start, so I
turned the burner onto low for a minute while I mixed with the stick
blender until it smoothed out (I mix my soap in the bottom of my
stainless steel spaghetti cooker). Was fine after that. Don't know if
I should raise the temperatures any more than this or not...I had
actually started around 100 degrees when that happened.
*I had some feedback that this
recipe was lye heavy so rechecked the numbers and went back to the
original SAP number for canola. The recipe has been adjusted from the
original to include 3 more ounces of canola oil (37). My test batch
turned out fine, but I thought I should be conservative since a
couple of folks had problems.I never had trouble on the previous
recipe either and have not had bad feedbaack and lots of thumbs up...
same sap number for canola as the original on this one... not sure
why the difference. The problem they experienced could have been from
the fragrance oil used.The original figure for the canola on this
recipe was 34 ounces.
Return to Table of
Contents
Are you getting the idea yet? You
can put together any combination of oils you like and vary them
according to what you have on hand and what properties you want in
your finished bar. This recipe produces nice texture and rich creamy
lather...the cleansing kind. The higher the coconut percentage, the
more suds and cleansing...this one leaves you with a little "squeak"
but not dry. Nice for stick blending...doesn't become thick too
quickly.
*Soybean with Coconut and Olive
(Kathy Miller)
- 44 ounces soybean oil
- 25 ounces coconut oil
- 16 ounces olive oil
- 24 ounces cold water
- 12 oz. lye crystals
|
Here's what the second variation on
"Almond Joy" looked like, using the recipe above. This soap
doesn't have quite as hard a finish as the first
version, but the extra coconut ensures a lot of lather. This
has a higher percentage (around 29%) of coconut. I wouldn't
go any higher than that in a recipe. These bars were three
days young when captured on my scanner! I wish the top
looked as finely grained as the edges.
|
|
As much as I loved the
texture of the bars of Favorite Castile after cutting, they don't
have the nice suds that the Almond Joy batch did...it had spoiled me.
As mild as olive oil soaps are, the sudsing is less and tends to feel
a little slimy (which doesn't bother some people). Anyway...I
did this recipe and upped the coconut and used more soy instead of
quite so much olive, while still retaining some olive for its
wonderful properties. For the batch shown above, I did the chocolate
swirl idea again (like "Almond Joy") but instead of powdered cocoa, I
melted 1.5 ounces of Ghirardelli's dark chocolate (one of my
Christmas presents) with a couple of teaspoons of the original fats
and mixed it into a small percentage of the soap after pouring most
of it into the mold. The 2 ounces of Bitter Almond FO were added to
the whole batch at thin trace and just before pouring the white part
into the mold. This soap was thinner when I poured it, because I
didn't want to have the ridged effect like the first one and it made
me nervous, but the soap set up just great and the swirls really
blended with no tendency to separate between colors.
Return to Table of
Contents
This batch was a variation on the one above, but I
cut back on the soybean oil and added avocado oil. It should make a
very nice soap, but drives up the cost considerably. The scent is
wonderful! Nice for stick
blending...doesn't become thick too quickly.
Mint Swirl with Avocado Oil
(Kathy Miller)
- 37 ounces soybean
oil
- 24 ounces coconut
oil
- 16 ounces olive oil
- 8 ounces avocado
oil
- 12 ounces lye
crystals
- 24 ounces cold
water
- Temperatures between 90 and 100
degrees.
-
- Add at light trace:
- 1 oz. spearmint essential oil
(2 T.)
- 1/2 oz. peppermint essential
oil (1 T.)
- 1/4 oz. eucalyptus essential
oil (1/2 T.)
(This smells great and
can be used with any recipe!)
|
![[Mint Swirl Soaps]](soap/MintSwirlSp.JPEG)
Mint Swirl Soaps
|
- I just bought my peppermint and
eucalyptus oils in the pharmacy section of a local market...pretty
reasonable there compared to local sources of EOs like the health
food store. If you mail order from a place like A Garden Eastward,
you can probably beat these. After mixing in the essential oils at
light trace and while the soap is thickening, but still rather
pourable pour most of the soap into your large mold (this recipe
didn't trace overly quick with the stick blender like some have).
Leave about 1/8 or 1/10th of it in the pan.
-
To this, I added these, which were being
kept warm and melted in a small measuring cup on the
stove:
- 1/2 blue/green Crayola
crayon
- 1/2 forest green Crayola
crayon
- A little bit of the original
oils
Mix the coloring in thoroughly and well (I
got a few bubbles in the soap while doing this with the blender) and
drizzle this soap over the white soap in the mold, distributing it
evenly over the top in back and forth motions. Then, take your
spatula or a knife and run it back and forth through the soap, first
one direction and then either in an opposite direction or on a
diagonal. Try to reach the bottom and sides of your mold while doing
this.
Note: This soap turned out really
nice except for one problem I had. There developed a thin layer of
discoloration on the top, sides and bottom. It was kind of tan and I
trimmed it off while cutting the bars. I don't know what caused this
and would like to hear from you if you try this recipe. Did you have
a similar problem? Could it be the avocado oil reacting to something
or maybe some other environmental thing? If you have any feedback,
email
me.
Return to Table of
Contents
You can use any fragrance combination you'd like
with this...I'm just running out of generic soap recipe
names!
Sweet Grass and Clary Sage Soap
(Kathy Miller)
- 24 ounces coconut
oil
- 24 ounces canola oil
(can use peanut,
corn or sweet almond oil)
- 36 ounces soybean
oil
- 24 ounces cold
water
- 12 ounces lye crystals
Temperatures: 110-120
degrees
Added at light
trace:
- 1 ounce Sweet Grass FO from
Sweet Cakes
- 1 ounce Clary Sage Essential
Oil
-
|
![[Sweet Grass and Clary Soaps]](soap/ClarySwGrassSps.JPEG)
|
This needed a little bottom heat
like the Cocanolive batch so I raised the temperatures here. After
adding the fragrance and essential oils, I stirred a bit longer and
then poured most of the soap. To the remainder, I added a few
shavings of teal green candle color that had been melted with a
little bit of coconut oil. This was mixed in quickly and the green
soap poured on top of the uncolored. I had intended to swirl it, but
the soap got too thick on me and try as I might, this was as much
swirl as I could get! It's actually kind of interesting the way it
turned out. If you want to recreate this look, you just have to let
the soap get to the soft pudding stage before adding the second color
and it will refuse to drop down and swirl with the rest of the soap
in the pan! This is a little heavier on Clary smell at this point
than Sweet Grass. You could probably up the Sweet Grass by another
half an ounce, or drop the Clary to 1/2 an ounce. They seem fairly
strong and I wouldn't add more than that for my nose...but you might
like POWERFUL smelling soap or need it to last for a long time in
storage.
|
![[Labeled Soaps]](soap/SoapsLabeled.JPEG)
|
This is to give you an idea of what a difference a label
can make in how your soap looks. These are not perfect bars,
but they are really set off by the label. If you are
planning to go into a soap selling business, packaging can
really make a difference in sales. I'm sure many of you will
come up with labels that are nicer than these...but they
give you the idea.
|
Return to Table of
Contents
All-Vegetable Blend
(Kathy Miller)
- 26 oz. soybean oil
- 20 oz. each canola, coconut, and olive oil (total of 60
oz.)
- 12 oz. lye crystals
- 24-26 oz. cold water
- Temps 100-110 degrees
Have had a couple of nice batches using this blend. I've noticed
with warmer weather that bars of soap with lots of olive or soybean
seem more prone to weeping glycerin. In this recipe, I added a bit of
canola since it is lower in the conditioning oils and also gives the
bar a nice sheen and texture.
Return to Table of
Contents
"Here is my recipe. I did NOT name this soap. This was named by a
group of people that loved it!" - Sherry Wersing
Sherry's Fantastic Soap
( Contributed by Sherry
Wersing, who wrote the poem at the top of the "Soapy Success"
page)
- 24 oz canola
- 18 oz coconut oil
- 6 oz cocoa butter
- 6 oz castor oil
- 16 oz olive oil (pomace or pomace/olive blend is fine)
- 9.8 oz lye
- 21-23 oz water
- Fragrance Oil or Essential Oil of choice
Temps: Water/Lye 105-110 degrees / Oils 110-115
degrees
This recipe has often been requested
on the Latherings Forum and the feedback from folks who've made it
has been great! Sherry has agreed to share it here for anyone who
would like to make it. It will not be as large a batch as the rest
posted on this site, so adjust for fewer bars/smaller mold. See
"Shaving Bar" variation below...
To make a GREAT shaving bar, WHICH BY THE WAY makes a GREAT
SHAMPOO BAR! (my hair only stays after being blown dry by THIS bar!
Perhaps it is the microcrystalline wax, I do not know. But the next
day, after sleeping on it, my hair brushes back into place! NEVER did
that before with ANYTHING!!!!!!!!!!!!
Sherry's SHAVING
BAR:
I make the above recipe, except that instead of using 6 oz of
cocoa butter, I use 2.5 ounces of cocoa butter and add a 3.5 oz tub
of PALMER'S COCOA BUTTER FORMULA (it is NOT a cream or lotion, rather
hard in a plastic tub..) The ingredients of it are cocoa butter,
mineral oil, microcrystalline wax, fractionated cocoa butter and
vitamins C and E. I infused calendula petals in the olive oil, but
this is just an option. Makes a thick lathering soap, and funny, but
a great shampoo bar!
Sherry's Fantastic Soap
- LARGER Batch
I've had a request to post a larger version of this recipe so
that it will be the same size as the other recipes on the site (for
people who have molds to accomodate that size). The following is
pretty close to the same percentages as Sherry's original, with minor
variations for the sake of simplifying the numbers.
- 28 oz. canola oil
- 22 oz. coconut oil
- 7 oz. cocoa butter
- 7 oz. castor oil
- 20 oz. olive oil
- 12 oz. lye crystals
- 26 - 28 oz. cold water
- Fragrance Oil or Essential Oil of choice
- Temps: Water/Lye 105-110 degrees / Oils 110-115 degrees
Return to Table of
Contents
I haven't tried this myself, but here's a
recipe from a fellow soaper...
Acne/Oily Skin
Soap
(Contributed by Lisa
Thomas)
I wanted a bar of soap that would help with a friend's acne/oily
prone skin & I had read that witch hazel, Tea Tree oil and some
other botanicals would be good for his skin. So I set out to make
some, just to experiment. I began by taking common cooking canola
oil. and adding the herbs; red clover, chamomile,slippery elm,
peppermint and comfrey leaves and gently heating them on the stove on
low heat for about 2 hours. (For the amount of oil, I usually use
about 2 Tablespoons of each herb. Also, someone wrote because she
found that after heating and soaking the herbs it "smelled and looked
funny"; she was worried it was burnt and unusable. So, just as a
pre-warning, it WILL smell kind of odd due to the combined herb
smell.The tea tree oil will more than cover up this smell for you.It
also should look light brown to a greenish color. As long as
it.doesn't smell burnt, and the oil isn't blackish brown it is fine.)
I strained, and set this aside.
- 9 oz. lye crystals (9.02 oz to be exact), dissolved into:
- 15 oz. of cold water and 10 oz. of
chilled Witch Hazel
(mixture turned a yellowish color after adding lye)
- 15 oz. infused canola oil (above)
- 15 oz. coconut oil
- 8 oz. olive oil
- 24 oz. soybean oil
- 1 oz. stearic acid
- 3 oz. of beeswax. (just stuff I had laying around :)
I heated all the oils together until the beeswax and stearic acid
melted and then set aside to cool.
I am afraid I am not the type of soapmaker who measures the
temperature of the lye/oils before she mixes. I just feel the side of
both containers until they still feel warm, but not hot to the touch.
I KNOW this is not exact- but I honestly have never ever had a failed
batch (knock on wood) yet.
So I added the lye to the oils ... it traced very very fast. I
started with hand blending for 2-3 minutes, then stick blended for
2-3 min. At this stage it was fairly thick - like heavy pudding. I
added:
- 1 oz. Tea Tree oil
- 1 tsp each of Lavender & Peppermint oils.
I then hand blended for another 2-3 minutes. At this point I was
beginning to think this would be my first unsucessful batch. It was
way to thick to pour out of the pan so I had to spoon/scoop it into
the molds. (It was a wonderful yellowish color- looked like the bars
of Neutrogena you buy.) I went ahead and decided to put them into the
molds to see what would happen. I put half into the Milky Way pattern
molds, and half into a box mold that would need to be cut later into
bars. I was working in my basement which was a stable 65 degrees. I
didn't insulate any of the molds- I just shut the light off and went
to bed.I was sure the next day I would find a big mess down there but
boy was I in for a pleasant surprise! The next morning I checked them
and they were hard enough already to unmold, and cut. They looked
great! I cured them for 3 weeks only, they had little to no ash
formed on the edges. [I would still
suggest four weeks cure time to be safe. The beeswax could be cut by
half and still make a nice bar. Not insulating is probably not a bad
idea with beeswax in the mix... any traces of honey will heat up the
soap quickly... somtimes too much. - Kathy]
Let me tell you - these bars are the best soap I have made to
date. Both the pattern molds and the cut bars held up equally well.
The bar hade a wonderful yellow color- looking alot like a bar of
beeswax. They smelled slightly medicinal but not too heavy. I think
the lavender lightens the scent some ( I added this due to reading it
had a antibacterial/antibiotic property in an herb book I have). I
have made this recipe 4 times now- each with equal sucess, and this
is a best selling bar for me. My friend loved it so much, he bought
30 bars for himself and a bunch of his friends. It helps "cut" oily
prone skin but leaves your skin very very soft. He swears that in
combination with my witch hazel/mint/vinegar
toner (recipe below for
those who have asked)- his acne problem is gone!
I hope more people will read this experience and realize that they
CAN make their own recipes.
-Lisa Thomas
Mint-Vinegar Toner for Oily
Skin (Lisa
Thomas)
- 1 tablespoon dried mint or 3 T. of fresh
- 2 tablespoons of apple cider vinegar (must be the apple!)
- 1 cup witch hazel
Mix all ingred. together stir thoroughly and allow to sit covered
for 3 days. Strain or filter out the mint (HINT if you use tea
bags- 2 of them, then you don't need to strain!). Pour into a clean
container with a lid, apply with cotton ball as needed.
I have found that this is excellent for my oily skin. Sometimes if
I get a little dry, like in the winter, I add a teaspoon of honey in
the mix to use at night. It helps add moisture to the skin as well as
combats acne, and clears up the red spots from old acne areas.
Return to Table of
Contents
Recipes Using Palm Oil
Return to Table of
Contents
This is the first of the batches I
made in a soapmaking marathon at the end of November '98. Nice
soap...great fragrance! Some of the ingredients in this one might not
be as simple to come by.
Pumpkin Spice
(Kathy
Miller)
- 2 ounces beeswax
- 28 oz. palm oil
- 14 oz. coconut oil
- 8 ounces grape seed oil
(because I had it
and needed to use it up!)
- 24 oz. olive oil
- 12 oz. shortening
(because I ran out
of olive! :-)
- 32 oz. cold water (4
cups)
- 12 oz. can lye crystals
(Lewis)
-
|
![[Pumpkin Spice Soap]](soap/PumpSpiceSoap.JPEG)
This first batch of pumpkin spice has a
slight case of "alien brain soap syndrome"! I think it's
caused by too much insulation when the soap is in gel
stage... there is such a thing as too
much!
|
Add at trace:
- 1 oz. castor oil
- 2 ounces Pumpkin Spice fragrance oil
(Sweet Cakes)
- 1 tsp. pumpkin pie spice
I didn't write down the temperatures for
fats and lye, but think they were between 95 and 100 degrees. It
speeds things up to wait and add the olive oil after you've melted
the harder fats and beeswax over the stove. It cools it down more
quickly.
This soap got nice and thick
rather quickly because I used the stick blender. I had to smooth it
with a spoon and there were a few furrows on the top. By morning, the
top of the soap had puckered and shrunk and my son said it looked
like a brain! I decided to leave the top as it was for an interesting
texture and not waste the soap trying to shave it off. It's nice and
firm with good texture.
* If you'd like to make this
recipe in a more simplified version, try this:
- 15 oz. coconut oil
- 24 oz. olive oil (or canola is
fine)
- 24 oz. palm oil
- 24 oz. soybean oil
- 12 oz. lye
crystals
- 32 oz. cold water
Return to Table of
Contents
This one is really yummy and
lathers extremely well! I didn't mark it with an asterisk because of
the palm and cocoa butter which you might have to special
order.
"Almond Joy" / Chocolate Almond
Swirl (Kathy
Miller)
- 16 oz. palm oil
- 14 oz. coconut oil
- 52 oz. olive oil
- 6 ounces cocoa
butter
- 32 oz. cold water (4
cups)
- 12 oz. lye crystals
-
-
|
![[Almond Joy Soap]](soap/AlmondJoySoap.JPEG)
The actual soap was not quite this "white". Flash
photography and scanning affected the final image.
|
Add at trace:
- 1 ounce Bitter Almond fragrance oil
(Sweet Cakes)
- 2-3 T. cocoa powder blended into about
1/4 of the soap at trace (after pouring 3/4 of it into
mold)
Temperature: 95-100 degrees
Instructions as usual. Add the Bitter Almond
oil at early trace and pour 3/4 of the soap into the mold/s. Mix the
cocoa powder quickly into the remaining soap (stick blender makes
this easy) and drizzle it over the top of the white soap in a back
and forth fashion. Take a butter knife and gently run it back and
forth to gently swirl the two colors together (you decide when it
looks pretty enough to stop). A note on adding the cocoa. You could
probably blend the powder with a small amount of the soap before
stirring it into the rest. When I did it, I added some olive oil to
the cocoa, but had some oil ooze out of the darker soap after it set
overnight, so think it was too much.
This soap was a bit ridged on top
where it was swirled as it got thick, but I left that on also. It
looks kind of neat and really smells strong! If you pour your soap at
light trace, this probably won't happen. I put in more Bitter Almond
than I listed in the ingredients above and it was a little too much
for my tastes, but will last longer. One ounce should be okay. The
soap is very hard, cleansing, and lathers well. People who are into
almond and chocolate really get excited over these bars!
:-)
Return to Table of
Contents
This is a wonderful recipe
for the stick blender and the texture at pour and after cutting is
GREAT! The almond oil can be replaced by other oils with a similar
sap value, which is what I did in the recipe after this one. I
renamed it back to "Peachy" because that's how I feel about the
recipe, whether it's peach scented or not! I keep using this over and
over.
*"Peachy" with Almond Oil
(Kathy Miller)
- 32 oz. soybean oil
- 16 oz. palm oil
- 16 oz. olive oil
- 14 oz. coconut oil
(2 T. of this was
corn popping coconut treated with beta carotene...for
color)
- 8.5 oz. almond oil
(that's how it was
bottled)
- 28 oz. cold water
- 12 oz. lye crystals
-
- Temps around 90-110
degrees
-
|
![[Peach with Almond Soaps]](soap/PeachAlmondSp.JPEG)
|
Added at light trace:
- 2 oz. Peach FO from Sweet Cakes
(I like the Peach Deluxe FO
better...will get that one next time)
- Optional:
1 tsp. Bitter Almond FO
- 1 T. paprika
(for color)
Now that I have some more palm
oil, I'll be experimenting with using it in more recipes. The expense
of ordering it is similar to my cost of buying olive oil at our local
Costco store, so I don't mind using it.. keeping that in mind. I
prefer to use it in lesser quantities though...a pound in a batch can
make quite an impact on the finished bar. The soybean in this recipe
cuts down on the expense and it offers emollient qualities and stable
lathering. It would not make a good bar of soap if used by itself,
but is very nice in combination with more saturated fats. It's also
very easily and inexpensively bought in the U.S. If you live in
another country, you may want to find some other common oil with a
similar sap value to replace it.
Some more soaps made with the "Peachy"
recipe:
![[Bay Rum Soap with Beeswax]](soap/SoapBayRum.JPEG)
Bay Rum with Beeswax
This soap had two ounces of beeswax
(colored with a honey smell) added to the base oils and 2
ounces of Bay Rum FO from Sweet Cakes. It's wonderful in
texture and scent!
|
![[Apricot-Freesia Soap]](soap/SoapAprFreesia.JPEG)
Apricot-Freesia
The base oils included 1/4 cup corn
popping coconut for color and part of the soap was swirled
after adding about 1 1/2 tsp. paprika. The scent was 2
ounces of Apricot-Freesia FO from Sweet
Cakes.
|
Return to Table of
Contents
This slight variation of the "Peachy" recipe
above, has a softer finish to the bars so far. Think it's the added
sugar. Think I will leave it out next time.
*"Purely Herbal" with Jojoba
Oil
(Kathy Miller)
- 24 oz. cold water
- 12 oz. lye crystals
- 1 T. sugar
(for lathering...
Dissolve in hot water first!)
- 34 oz. soybean oil
- 24 oz. olive oil
- 16 oz. palm oil
- 14 oz. coconut oil
- 1 1/2 tsp. shaved cerise wax
candle color
(melted with base
oils) Temps: 100-110
degrees
-
Added at light
trace:
- 1 1/2 tsp. paprika (for
color)
- 2 oz. jojoba oil
- 2 oz. "Purely Herbal" FO
(Smells like Herbal Essence) from Sweet Cakes (or
whatever you want!)
|
![[Herbal Soaps with Jojoba Oil]](soap/SoapPHerbal.JPEG)
|
The sugar added to the soap gives
the finished bar a more translucent quality, making the color darker
than when sugar is not added. I LOVE this basic recipe...it is a joy
to mix with the stick blender and doesn't suddenly set up on you as a
general rule (depending on what you add at trace). The Purely Herbal
FO has quite a fruity smell...almost reminded me of when I'm peeling
and coring lots of apples for canning. If you use some other scent,
you might not want the color I chose. You can add anything you want
to any of the base recipes on the page, within reason!
Return to Table of
Contents
This is a variation of the
"Chocolate Mint" soap on the animal fats recipe page. I have not
actually done this version yet, but it should be very nice and I
wanted to post it for those of you who may want to do it without any
animal fats. I love the other one! If you tailor ANY recipe and use 8
oz. of cocoa butter in it, you'll get the wonderful traits of cocoa
butter in your finished soap. Just be sure that if you include that
much in a recipe that already has a high percentage of saturated fats
in it, that you use the amount of water usually suggested on the MMS
lye calculator. Cocoa Butter makes a HARD bar! Skimping on water for
a high saturated fat recipe makes the bars very difficult to cut!
:-)
White Chocolate
(Kathy Miller)
- 40 ounces soybean oil
- 16 ounces olive oil
- 16 ounces coconut oil
- 8 ounces palm oil
- 8 ounces cocoa butter
(food grade...the GOOD
smelling stuff!)
- 28-32 ounces cold water
- 12 ounces lye crystals
- 1 oz. fragrance or essential oil if
desired at trace, such as peppermint, almond, or non-discoloring
vanilla if you'd like. If you use regular vanilla or chocolate
fragrance oil, it will turn the soap brown...which is fine. It
just won't be "white" chocolate anymore!
-
- Temps 100-110 degrees
If you use good smelling cocoa
butter, this will smell nice on its own, even without added fragrance
oil. The cocoa butter gives the lather a really nice creamy feel and
it's SO gentle on the skin. Since cocoa butter costs more than the
other ingredients, this is kind of a luxury soap at my
house!
Return to Table of
Contents
The Canolive II recipe is excellent for molding
and makes a nice smooth firm bar, so I tried this version using a bit
of palm oil.
Canolive III
(Kathy Miller)
- 36 ounces canola
oil
- 36 ounces olive
oil
- 10 ounces coconut
oil
- 8 ounces palm
oil
- 26 ounces cold
water
- 12 ounces lye
crystals
For this batch I added at
trace:
- glycerin...probably about
1-2 ounces
- 1.5 oz. lavender and
lavandin essential oils (think I would prefer all
lavender next time...a bit softer... and since I first
did this, I would now mix the EOs with some Lavender
Flowers FO from Majestic Mountain Sage... it has
lasting power where the EOs die over
time.)
- purple candle dye shavings
melted in with base oils
-
- Temps 100-110
degrees
|
![[Lavender Soaps]](soap/LavenderViolets.JPEG)
|
- This makes a nice hard bar of soap with
a silky feel contributed by the canola oil. The palm adds to the
hardness and lather of soap.
- Return to Table of
Contents
As of August 1999, this is my favorite all
vegetable recipe that uses palm (although I like the Favorite
Castile II really well, it is more prone to melt in the dish if
exposed to too much dampness). This makes a sleek and hard bar
with great lather while still being mild. If you use canola
instead of soybean, the bar will have a glossier and harder
finish. Both make nice soap.
-
Sudsy All-Vegetable
(Kathy Miller)
- 24 ounces coconut
oil
- 24 ounces olive
oil
- 18-20 ounces soybean or
canola oil (18 will yield a slightly harder
finish)
- 16 ounces palm
oil
- 24-26 ounces cold
water
- 12 ounces lye
crystals
-
-
- Temps 100-120 degrees
(varies according to what you use for fragrance...
some fragrance oils work at higher temps)
-
The bar at right was scented
with 2 oz. of the King's Ransom EO blend from A Garden
Eastward and swirled.
|
![[King's Ransom EO Soap]](soap/SoapLtMyFire.JPEG)
This was the first batch I did with
the Sudsy All-Vegetable Recipe.
|
Return to Table of
Contents
November, 2001... this is the latest recipe I've
been making for sales. Some people don't like to read "canola" on the
label or think it might be more prone to weeping in storage (I've not
had too much trouble in our moderate climate). I decided to post this
as another option for those who don't mind purchasing coconut and
palm oil.
Soap Classic
(Kathy
Miller) This is
my current favorite!
- 39 oz. olive oil (For harder soap substitute 2 oz.
of cocoa butter for 2 oz. of the olive)
- 24 oz. coconut oil
- 18 oz. palm oil
- 26-30 oz. cold water (lower for essential oils,
higher for troublesome fragrance oils)
- 12 oz. lye crystals
-
- Temperature around 100 to110 degrees.
This is the latest recipe I've been making. Some
people think canola can be problematic for weeping in
storage, so I'm using this classic combination of olive,
coconut and palm. I've tweaked this from the original and
cut back a little on the olive oil... I think it stores
better.
|
![[Mango Mélange Soap]](soap/SpMangoMelange.jpg)
Mango Mélange... a
confetti type soap.
|
Recipes Using Palm Kernel Oil
Return to Table of
Contents
I finally got some palm kernel to
play with in the Summer of 2000. This is the first recipe I've used
and like it very much. This and the "Sudsy All Vegetable" are the
ones I used most for sales. They are harder and last longer in the
dish (this one is a bit firmer and has a few more suds). I thought
this recipe might be better for molding, but haven't tried that
myself. If that's your aim, I'd use the olive instead of the soybean.
Also... olive will make a slightly more conditioning soap.
"Pound" Soap
(Kathy
Miller)
- 16 oz. canola oil
- 16 oz. coconut oil
- 16 oz. palm oil
- 16 oz. palm kernel oil
- 20 oz. soybean or olive oil
- 24-28 oz. cold water (lower for essential oils,
higher for troublesome fragrance oils)
- 12 oz. lye crystals
-
- Temperature around 110 degrees.
|
![[Piña Colada Soap]](soap/SpPinaColada2.jpg)
One of the first batches from this recipe
was "Piña Colada'. This one substituted about
8 oz. of Macadamia Nut Oil for part of the olive or soybean
(Macadamia has a slightly higher SAP value) and was scented
with two ounces each of coconut and pineapple fragrance oil.
The yellow bits are a few calendula petals tossed in for
color.
|
I like to measure out the first four oils (one pound of each) and
melt until clear. Then pull it off and add the 20 oz. of olive (or
soybean is fine) oil. This helps to cool it down to 110 degrees
quicker than putting them all in at the front.
Return to Table of
Contents
I made two revisions of the favorite Sudsy-All
Vegetable recipe which incorporated palm kernel oil, which makes a
harder bar with stronger cleansing/lather. I think I like the
first one best... but they are just slightly
different.
Sudsy All-Vegetable Soap with Palm
Kernel (Kathy Miller)
NEW!
- 20 oz. coconut oil
- 16 oz. palm oil
- 16 oz. canola oil
- 8 oz. palm kernel oil
- 24 oz. olive oil
- 24-28 oz. cold water (lower for essential oils,
higher for troublesome fragrance oils)
- 12 oz. lye crystals
-
- Temperature around 110 degrees.
|
![[Stress Relief Soap]](soap/SpStressRelDec00.jpg)
This was a batch of "Stress Relief" blend
(spearmint, peppermint, corn mint and some anise) that used
chromium oxide green for the swirling color.
|
I like to measure out the first four oils (one pound of each) and
melt until clear. Then pull it off and add the 24 oz. of olive oil.
This helps to cool it down to 110 degrees quicker than putting them
all in at the front.
Sudsy All-Vegetable Soap with Palm
Kernel #2 (Kathy
Miller)
- 16 oz. coconut oil
- 16 oz. palm oil
- 16 oz. canola oil
- 10 oz. palm kernel oil
- 26 oz. olive oil
- 24-28 oz. cold water (lower for essential oils,
higher for troublesome fragrance oils)
- 12 oz. lye crystals
-
- Temperature around 110 degrees.
|
![[Frank & Myrrh Soap]](soap/SpFrankMyrrh2.jpg)
This batch was scented with Frankincense
and Myrrh fragrance oil for the holidays. It turns the soap
a tan shade. I think it would have smelled even better with
a touch of vanilla FO (not my idea, but from Jim
Adlhoch).
|
|
This makes a hard soap with lots of
lather, but very mild. Note that this recipe is slightly
larger than the ones that I usually post and uses nearly 14
oz. of lye.
Double Bubble!
(Mona from the
Latherings Forum)
- 30 oz. coconut oil
- 20 oz. palm oil
- 10 oz. palm kernel oil
- 26 oz. olive oil
- 10 oz. canola oil
- 32-34 oz. of cold water
- 13.78 lye (7% lye discount)
|
Return to Table of
Contents
Design Your Own
Recipe!
- Has been moved to its own
page so that you can print it on its own for reference. This includes
updated
saponification tables and "Properties of Oils" charts. Also
included are some ideas for coloring and scent blending.
|
|
Do you still have
questions?
For more information on where to find other good
soapmaking sites, ingredients and equipment, more recipes
and information...go to my Soapmaking
Links
Page!
To learn more from other people's experiences and
suggestions...go to the "Soapy Success"
Page.
|
Here are some good pages with other recipes to try (soap and
cosmetics, which I don't make much):
- This page last updated on 20 July 2009.
- Header Graphic: Courtesy of Print Artist 4.0
Platinum
If you still have questions, please read through the information on the Troubleshooting Help page, MOST Frequently Asked
Questions and Modern Procedures. More can also be learned through the Botched Batches and Soapy Success pages. Many common problems have already been addressed on the site and it's difficult for me to keep up with emails these days and get anything else done. If your question involves my looking up information that you can also research, or going over numbers and recipe calculations, I might not respond if in the middle of a project around our home and garden. I apologize for this, since I've enjoyed my correspondence with people and don't like to ignore emails of any kind. Thanks! :-)
![[Sage, Sweetgrass & Cedar Soap]](soap/SpSageSGCedar.jpg)
![[Cool Water Soap]](soap/SpCoolWater.JPEG)
![[Candy Cane Soap]](soap/SpCandyCane.jpg)
![[Oatmeal Soap]](soap/SpOatmeal.jpg)